
In the consumer world we live in sometimes it seems easier and faster to simply purchase items rather than making your own, but that leads to mass amounts of items and keeps you from being the original and unique self that you are.
One thing that we used to customize at home was our house keys. I remember getting my first one and being super excited to decorate it and make it unique and then showing it off at school – which in the end led me to losing it, but I did enjoy it while I did have it! Now it is simple to just run to any grocery or home repair store and pick up one of the many keys they have on stock, but then all the fun of creating your own special key is taken away.
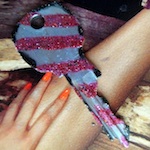
So I have created a custom key that only I can have and I just love that! Below I have photographed my step-by-step process of creating my candy-stripe key that I made with something most of you probably already own, nail polish!
 Step 1: First make sure that your key is extremely clean. You don’t want to start painting it with any dirt on it, so make sure you have a clean slate to begin on. Then I added a thin coat of clear nail polish to create the base level of your key.
Step 2: I then began to coat the entire key with a silver nail polish. This is a metallic shade so it glistens in the lights, but matte colors are great for this as well. The color I chose was unfortunately quite sheer so I painted three coats of the silver, allowing ample drying time between each layer.
 Step 3: This is where the real fun begins! You can basically do any design you would like on the key now that you have a solid coat for the background. I chose to play around with some sparkly pink stripes, but anything from polka-dots to hearts or other shapes can be super easy to create and lots of fun! After the pink stripes I thought it needed just a little bit more pizazz, so I added more sparkle, of course! I lined the edges of the key with shimmering black nail polish.
Step 4: Now that all the colorful additions are done on your key, make sure to let the paint sit and dry for plenty of time. After that it is time for the final clear coat to seal the polish in. I layered it on a little thick for this coat just to make sure it was nice and smooth. I recommend leaving it for an hour to fully dry before using it, and then of course enjoy it and make sure to show it off to all your friends when it is complete!


